How to
generate revenue with your brands and quickly setup an e-commerce platform
Make your products PrintReady today!
Start your shopify store
The Shopify Help Center is a fantastic resource when learning to use and optimize this exciting and versatile eCommerce platform.
Once you've made your Shopify store you can install the PrintReady application by navigating here!
PrintReady Product Creation
Launch PrintReady
-Launch PrintReady from the Installed Apps list in Shopify.
-Any previously made PrintReady products will list on the home screen. When first using PrintReady your product list will be empty.
-Select the “New Product” button to begin the new product wizard.
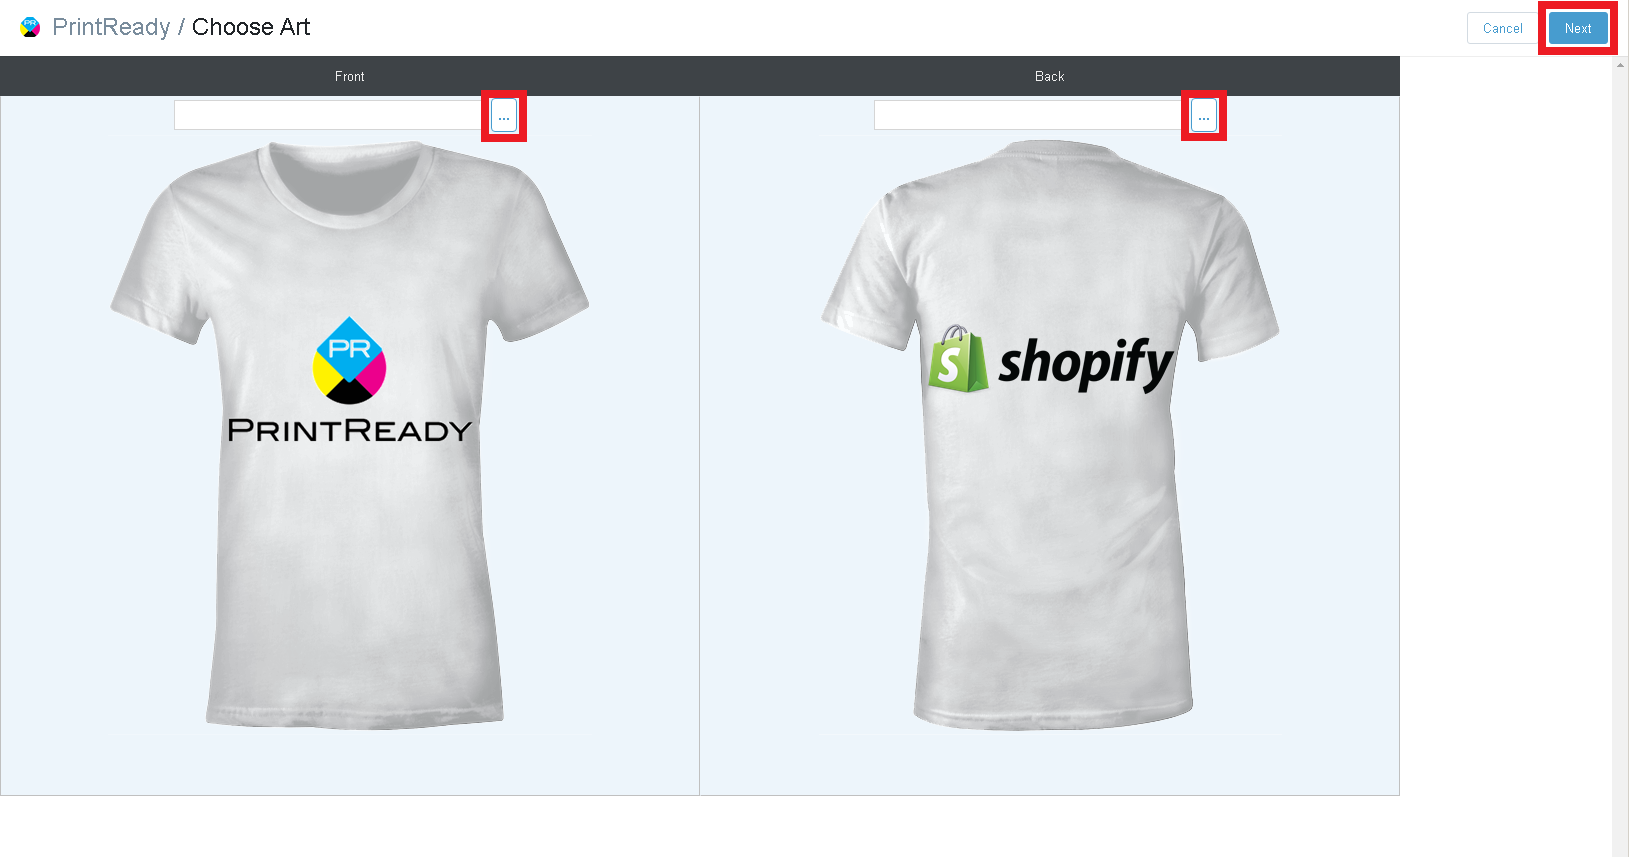
Step 1: Select Art And Design Location
Note: Do not navigate the product creation wizard using your browser’s forward and back buttons.
The application contains navigation buttons in the upper-right corner so that you can modify previous selections as needed.
-Select design locations for your product. Our current configurator allows for the selection of a front design,
a back design, or both. For each desired location you will select the mockup window’s browse button and navigate to the directory where your art file is stored.
-Once a file is selected your art will upload. A blue progress bar will track the upload and your art will display on the design mockup once complete.
-When you are happy with your art choices select the next button.
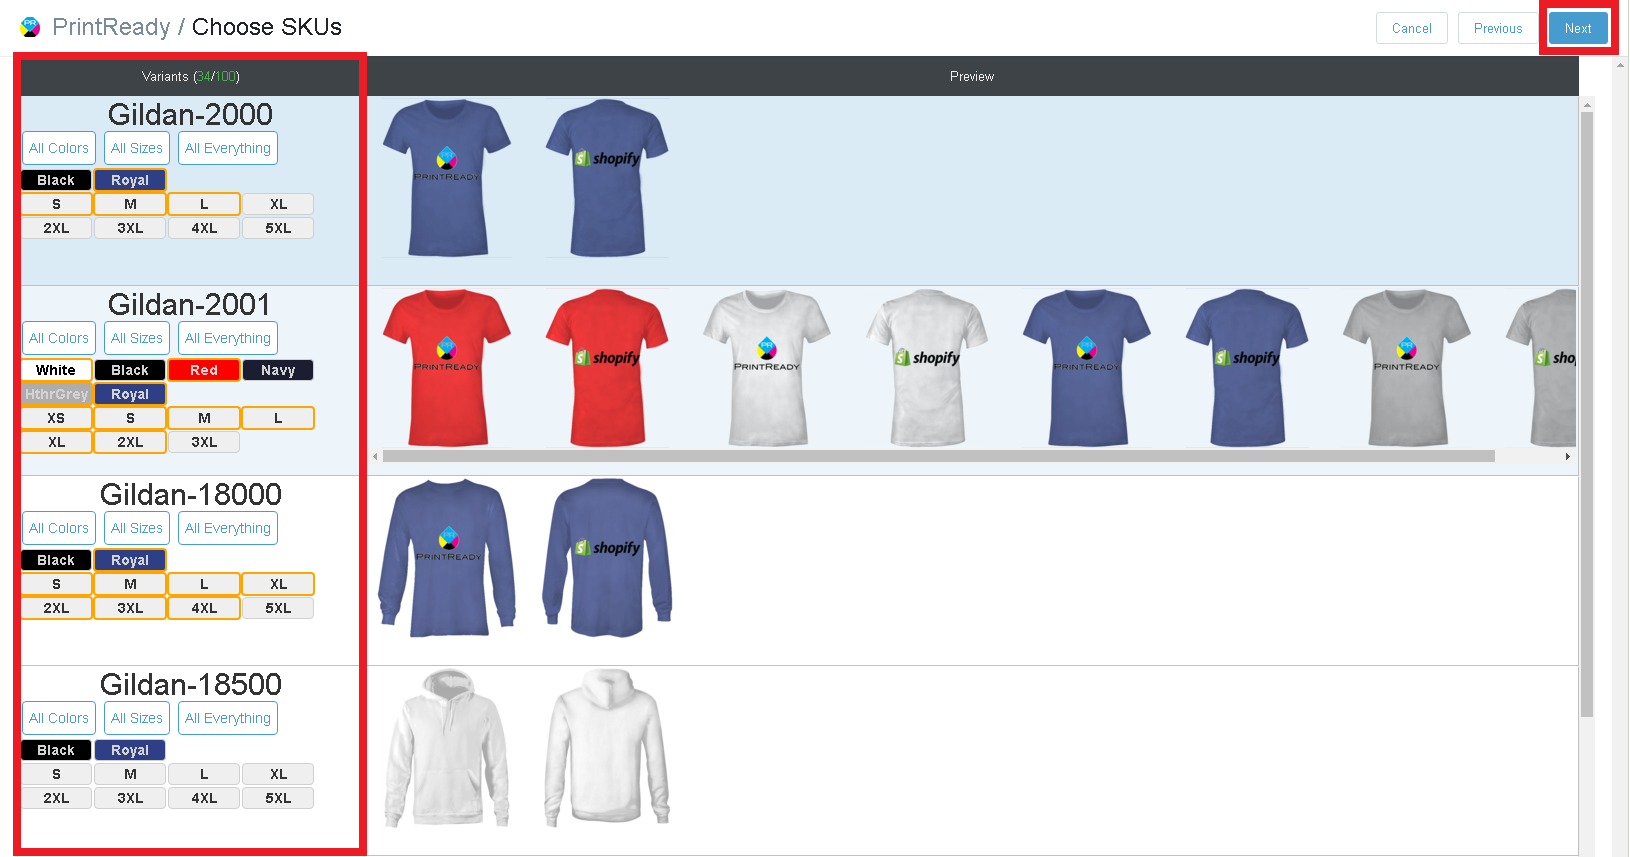
Step 2: Select Product Variants
-Each row displays an available garment type for your product.
-Within each garment type row you can select and deselect colors and sizes.
-Every unique color-size-garment combination that you select is a Shopify “variant”. As selections are made garment-color-art mockups are available in the preview column.
-Shopify limits the total number of variants you can create for any given product to 100. We track the total number of variants you’ve selected at the top of the column on this page for your convenience.
-When you are happy with your product variant choices select the next button.
Launch PrintReady
Create A New Product

Step 1
Select Your Art
Step 2
Select Your Product Variants
Step 3
Set Your Product Metadata and Price
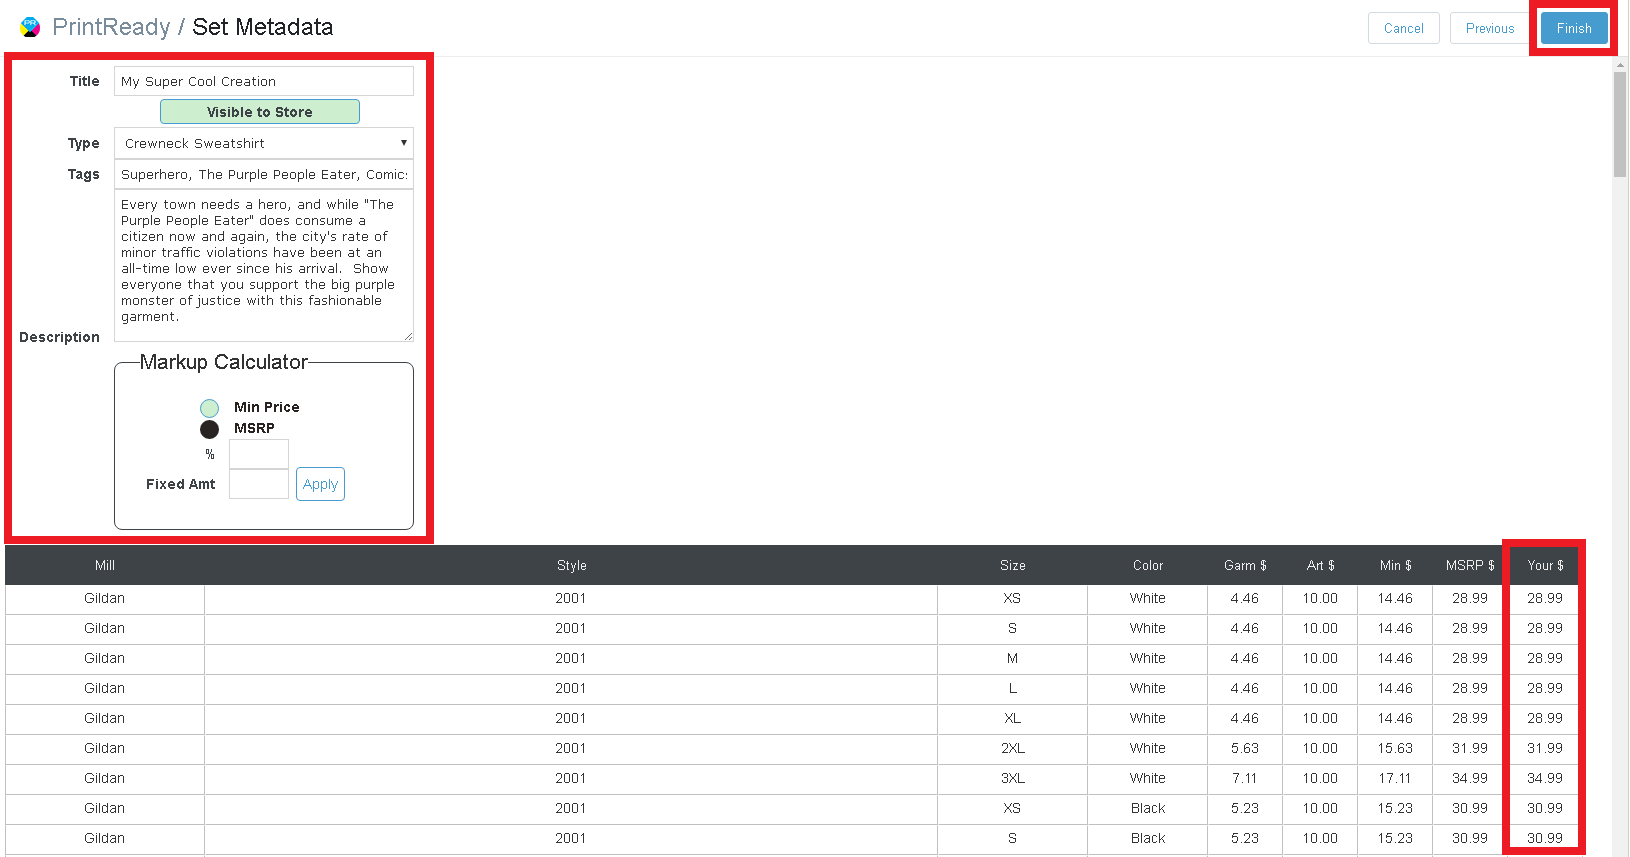
Step 3: Set Product Metadata
-Provide a name for your product in the Title field. This name will display when browsing your created products.
-select whether to make the newly created product immediately visible within your Shopify storefront by toggling the “Visible to Store” button green or red
-Choose descriptive tags for the product to allow for easy sorting, filtering, and management within your Shopify store (e.g. “Superhero, The Purple People Eater, Comics, Fantasy”). Each tag should be separated from the next by a comma as in the example.
-Provide a brief description of your product in the text field provided. This will list below the product image in your Shopify storefront. Be creative to grab the attention of prospective customers!
-See the Markup Calculator guide below for details regarding how to set the sale price of your variants. When you are happy with your product metadata select the finish button. The product will now upload and be available within your Shopify store!

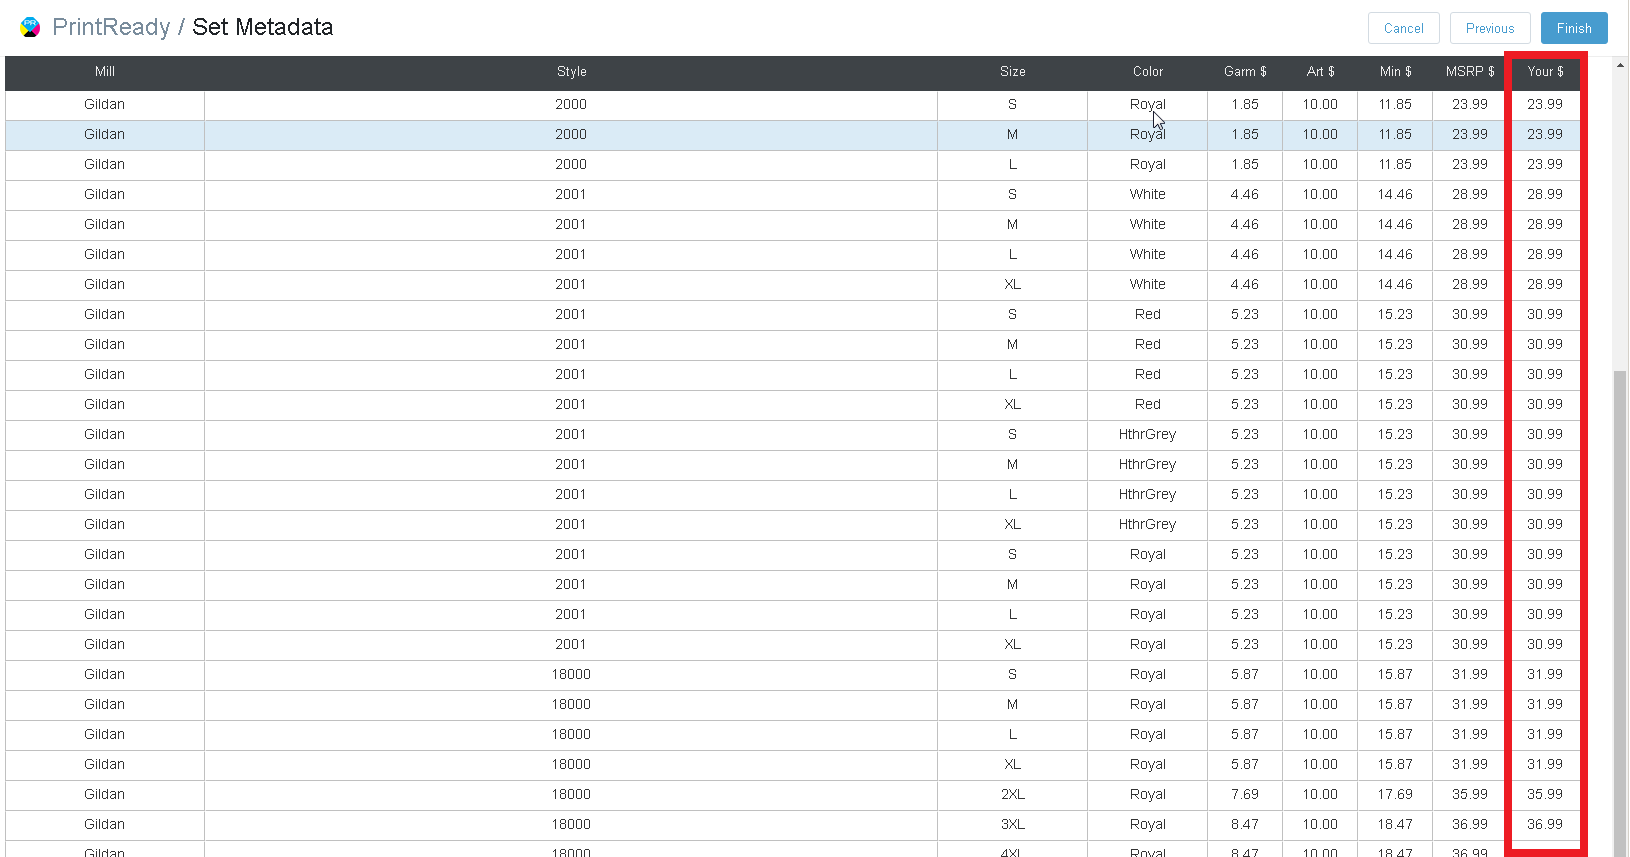
The Markup Calculator: Set Product Price
The Markup Tool is designed to facilitate easy storefront price setting while simultaneously allowing for granular control of each variant’s listed price. A brief description of each column can be seen by hovering over a column header within PrintReady's product creation wizard.
All columns are set values derived from the variant’s SKU selection with the exception of Your $. This is the price that will be displayed to your customers when visiting your Shopify storefront .
The markup calculator will set Your $ based upon either the listed Min $ or the listed MSRP. The markup is set as percentage or fixed amount increase on either of these values. E.g. 50% markup on the MSRP value will result in Your $ being set at 150% of MSRP for the variant while a “10.00” markup on the Min Price value will set Your $ to $10.00 above the variant’s cost.
After you have set your product markup, Your $ values can be edited manually per variant via a double-click upon the Min $ column cell that you wish to edit.
Once you are happy with the sale price of your product variants. Select Finish in the window’s upper-right corner. Once all product variants have successfully uploaded to your Shopify store you will be returned to the application home page where all of your PrintReady created products are listed.